In this article, you will see how to set up AWS Organizations and their features.
You will also see some use cases, how to create users, how to attach policy on those users, and how to create multiple users under one master account and attach different policies to different users.
AWS Organizations:
AWS Organizations is an account management service that enables you to create multiple AWS accounts into an organization and you can create and manage. As an administrator of your organization, you can create accounts in your organizations and invite existing accounts to join your organizations.
Use Cases: Offers policy-based, central management for multiple AWS accounts.
- AWS Organizations enables users to automatically create AWS accounts and add them to your organization, or add an existing AWS account to your organization. These added accounts can then be organized into groups called organizational units (OUs).
- Create groups of accounts and then apply policies to those groups.
- Centrally manage policies across multiple accounts. Organizations remove the need to manage security policies through separate AWS accounts.


Steps that illustrate how to create AWS Organizations:
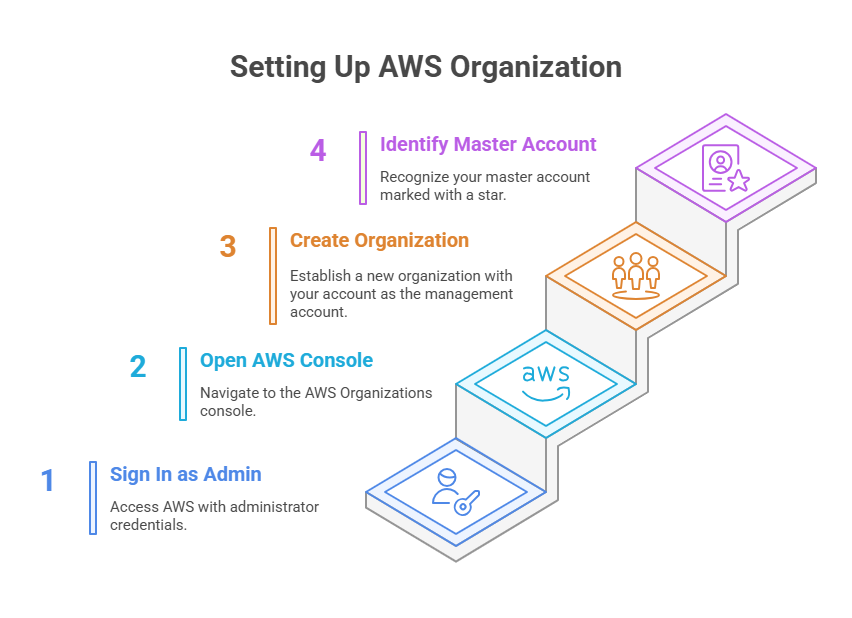
Step 1: Create your Organization
In this step, you sign in to your account as an administrator, create an organization with that account as the management account.
1. Sign in to AWS as an administrator and open the AWS Organizations console.

2. After entering your organization page you will see your master account which is signified by star.

Here you can see your email address and your account id.
You now have an organization with your account as its only member. This is the management account of the organization.
In this way, you can create your organization in your AWS
Now you will see how to create a child account in your organization:
Now you have an organization. You can create an account to join as a member of your organization.
Step 1: To create an account to join
- Navigate to your AWS Organization page and choose to add account.

- On the add account page choose to create an account.

- On the create account page you have to fill with credentials like account name and email address. These fields are mandatory. You have to provide an account name and a unique email address that is not associated with any AWS account.
After that, you need to click create button.

- After creating accounts you will get confirmation mail in your email id. After confirmation you can see your child account in your AWS organization.

- When your account gets created you need to provide your email id for login and also you need to do forgot password for your account password. In this way, you will get login credentials and can access your child’s account.
You can remove those accounts from your Organization whenever you want but you cannot remove your management account which is your master account.
In this way, you can create multiple child accounts under your master account.
In this example we saw how to create a new AWS account, you can also invite accounts of any existing accounts.
Step 2: Create the organizational units:
In this section, we will create Organizational Units or OUs.
Before we create Organizational Units we will understand what Service Control Policies are.
Service Control Policies: SCP is not something that is basically granting access to your IAM users. It is basically kind of creating a boundary. It is saying that maximum how much permission your account has. As you go ahead and attach your SCP to the root or to any OU, all the accounts under that OU would actually inherit that particular SCP.
The purpose of SCP is when you go ahead and create SCP when you want to enforce the similar type of restriction or boundary to multiple accounts. So you go ahead and specify all of that in one service control policy and then go ahead and attach it at an OU level and all the accounts under that OU would go ahead and inherit that SCP. Whatever boundary you define becomes applicable to all the accounts.
Now we will see how to create Organizational Units.
Step 1: First you have to go to your AWS Organizations console and choose to organize accounts. Before creating you must sign in as an IAM user, assume an IAM role, or sign in as the root user. The console displays all of your AWS accounts in that top-level view.

Step 2: When you are in the correct location choose new organizational unit tile. In the Create organizational unit dialog box, enter the name of the OU that you want to create. When you are finished, choose Create organizational unit.


Your new OU appears inside the parent. You now can move accounts to this OU.
We can see the three accounts are at their root level. The root is basically the starting point.
OU is nothing but a collection of certain accounts.
Now we are going to do is aQb account and the developer both are going to move in the Production OU.

Now we can see we have our master account and one OU.

In Production OU we can see the two accounts.

We can create another Organizational Unit inside the Production OU and can move one account to that OU.

Now we can see inside Test OU our aqb account is there.

Now we can see that in the root level we have our master account, inside Production OU we have our account developer account, and under Test OU we have another AWS account, which is aQb account.
So we can go ahead and create a hierarchy like this.
Now we will see that how we can apply Services Control Policies on different Organizational Units how would they work
There are two ways you can use SCPs. The first is the Blacklist method and the second is Whitelist Method.
Blacklist Method: By default, you allow all the actions in your AWS account. So what can you do? Certain things you can restrict, that you go ahead and deny using your SCP. For example, you allowed everything in your AWS account but you do not want to create or modify anything in the CloudTrail by people. In that case, you have to deny only CloudTrail related actions like modifications, deletions, or something like that.
Whitelist Method: The way it works is you should go ahead and basically remove the full AWS access SCP. That means nothing can be done in your account, nobody will able to do anything. But you can attach certain SCPs in your AWS account. In that scenario, Whitelist comes.
So these are the two methods of how SCPs can be used.
Example: Prevent any VPC that doesn’t already have internet access from getting it
You already know that in order to give internet access to a VPC you need to attach InternetGateway. But here we deny that particular action, which means the user should not be able to create InternetGateway also he should not be attached InternetGateway.
By default FullAWSAccess policy is created and it attached in the root level.
So we are going to create a policy.
Go to Policies in your AWS Account. Then click on Create policy. Give it a name and paste your policy. After click on create policy.


Now we can see our newly created policy

After that, we are going to attach the policy at the root level.

Once the policy attached at the root level it will be inherited all the OUs below it.
So now we are going to log in to one of the accounts inside OUs.

Now we are going to create a VPC and then trying to create an InternetGateway and attach too.

Let’s quickly create Subnets within this.

So our Subnet is also created.
Now let go ahead and try to create an internet gateway and attach it to this.

We can see that we are allowed to create InternetGateway.
Now we are going to the policy section again in our AWS console and modify the policy in the edit policy section.

If we just say creation is allowed but attach is not allowed, then we have to do is just remove the create part from the policy.
What will happen from this? It will be allowed to create of the InternetGateway but will not allow attaching. Let’s see


After removing the create part what we can see?

Yes, now our InternetGateway is created.
And now we are going to attach it.


So I think we get the idea. The point is because it is restricted from SCPs level even my root user can not go ahead and do this.
So guys this is a very powerful SCP concept, and hope this helps.
Thank You.